

The Complete Guide to FRP (Fast Reverse Proxy) – Internal Network Penetration
Introduction
Have you ever run into any of these frustrating situations?
- You set up a NAS or home media server at home, but can’t access it from outside
- You developed a web app that only works on your local network, and you can’t share it with friends over the internet
- You have a Raspberry Pi or an internal server, but you can’t remotely control it because you don’t have a public IP
All of these problems can be solved with FRP (Fast Reverse Proxy). This article will walk you through the principles, use cases, and a complete step‑by‑step setup guide for FRP.
1. What is FRP and What Can It Do?
1.1 What is FRP?
FRP (Fast Reverse Proxy) is a high‑performance reverse proxy application focused on internal network penetration. It is written in Go and supports TCP, UDP, HTTP, HTTPS, and many other protocols. It can expose internal services to the public internet securely and conveniently via a node with a public IP address.
Official GitHub repository: https://github.com/fatedier/frp
1.2 What Can FRP Do?
FRP has a wide range of use cases:
| Scenario | Description |
|---|---|
| Remote access to home NAS | Access your home NAS from outside to view files or stream media |
| Remote development & debugging | Expose your local development service to the internet for third‑party testing |
| Build a private VPN | Combine FRP with SSH for secure remote access |
| Access LAN devices | Such as IP cameras, printers, smart home devices, etc. |
| WeChat/Alipay webhook development | Receive external callbacks to your local service |
| Game servers / multiplayer hosting | Such as hosting a Minecraft server for friends |
2. Why Do We Need FRP?
2.1 The Problem with Internal Network Devices
For hosts on the internet to communicate with each other, they need to know each other’s public IP addresses. But in reality:
- IPv4 address exhaustion – Global IPv4 addresses have long run out, making it difficult for regular users to obtain a public IP
- NAT (Network Address Translation) – Most users are behind a network topology like this:
User Device → Home Router → ISP NAT → InternetYour home router assigns a private IP (192.168.x.x, 172.16.x.x, or 10.x.x.x), and your ISP may further use CGNAT (Carrier‑Grade NAT), sharing a small pool of public IPs among many users.
The result is: the outside world cannot initiate a connection to any of your devices.
2.2 Comparison of Common Solutions
| Solution | Pros | Cons |
|---|---|---|
| Commercial tools (like Ngrok, Hamachi) | Works out of the box | Free tiers are rate‑limited/throttled, contain ads, require payment |
| IPv6 | Direct addressing | Some ISPs restrict it, older devices don’t support it |
| Apply for a public IP | Truly public access | Some ISPs (e.g., China Telecom) may offer it; others (China Mobile/Unicom) generally don’t |
| FRP | Fully self‑controlled, supports multiple protocols | Requires a cloud server (VPS) |
2.3 Advantages of FRP
Compared to other solutions, FRP offers:
- Full control – Only a cheap cloud server (VPS) is needed, costing around $3‑5/month
- Multi‑protocol support – TCP, UDP, HTTP, HTTPS, etc.
- High performance – Uses TCP connection multiplexing to save resources
- Security – Supports TLS encryption and authentication
- Cross‑platform – Works on Linux, Windows, macOS, Raspberry Pi, and more
3. How FRP Works – Detailed Explanation
3.1 Core Components
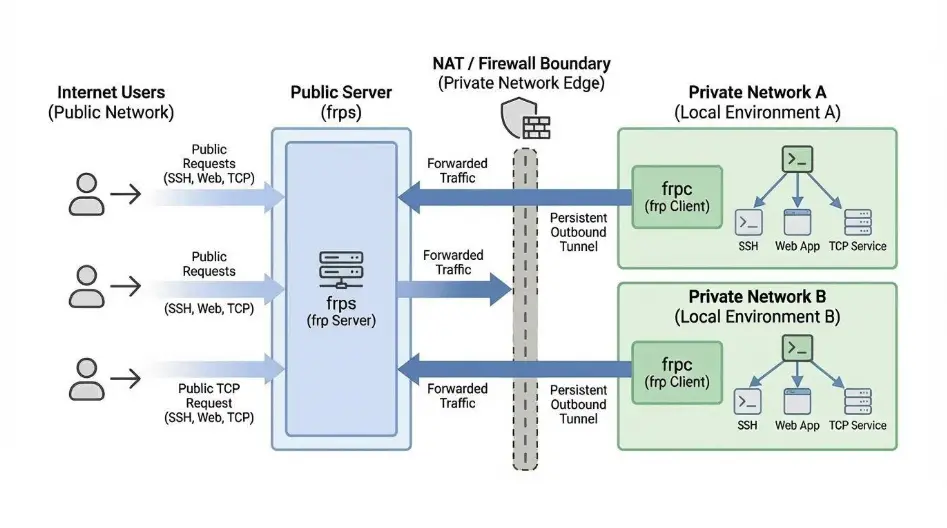
FRP uses a C/S (Client/Server) architecture with two core programs:
| Component | Runs On | Function |
|---|---|---|
| frps (Server) | Public server (VPS) | Receives external requests and forwards them to the internal client |
| frpc (Client) | Internal device (PC/NAS/RPi) | Actively connects to frps and registers local services |
3.2 Workflow
FRP works as follows:
┌─────────────────────────────────────────────────────────────┐│ Public Server (frps) ││ ┌─────────┐ ││ │ frps │◄────── Control connection (TCP long‑live) ────► frpc ││ │ │ ││ │ Port │◄──────── Data forwarding ────────────────── Internal Service ││ │ Mapped │ ││ └─────────┘ │└─────────────────────────────────────────────────────────────┘-
Outbound connection from internal network: When frpc starts, it actively connects to frps’s listening port (default 7000) and establishes a persistent TCP long connection
-
Service registration: frpc tells frps: “I can proxy the local HTTP service at 127.0.0.1:8080”
-
External request arrives: A user visits
http://public_ip:portorhttp://domain, and DNS resolves to the frps server -
Smart routing: frps finds the corresponding frpc based on the port number or HTTP Host header
-
Data forwarding: frps notifies frpc via the existing connection, the two establish a data channel, and all subsequent traffic is forwarded bidirectionally
3.3 Supported Proxy Types
FRP supports multiple proxy types for different use cases:
| Proxy Type | Use Case | Features |
|---|---|---|
| TCP | General port mapping | SSH, RDP, game servers, etc. |
| UDP | UDP port mapping | DNS, video streaming, etc. |
| HTTP/HTTPS | Web services | Supports virtual hosting, automatic Host header handling |
| STCP/SUDP | Secure internal proxies | No public port exposure; requires frpc on both ends |
| XTCP | P2P direct connection | After hole punching, traffic bypasses the server to save bandwidth |
4. FRP Setup – Step by Step
4.1 Prerequisites
Before you start, you’ll need:
- A Linux public server (VPS) – Ubuntu or CentOS recommended, minimum 1 vCPU 1 GB RAM
- An internal device (Windows/Linux/macOS/Raspberry Pi)
- A domain name (optional, but required for HTTP/HTTPS mode)
4.2 Download FRP
Download the latest binary from the GitHub Releases page:
# Download (choose the version for your system architecture)wget https://github.com/fatedier/frp/releases/download/v0.62.0/frp_0.62.0_linux_amd64.tar.gz
# Extracttar -xzf frp_0.62.0_linux_amd64.tar.gzcd frp_0.62.0_linux_amd64After extraction, you’ll see the following files:
.├── frpc # Client binary├── frpc.toml # Client configuration├── frps # Server binary├── frps.toml # Server configuration└── LICENSEThe server and client use the same binary – just different config files. Let’s separate them:
# Create directories for server and clientmkdir -p /opt/frp/servermkdir -p /opt/frp/client
# Server gets frps and frps.tomlmv frps frps.toml /opt/frp/server/
# Client gets frpc and frpc.tomlmv frpc frpc.toml /opt/frp/client/4.3 Configure the Server (frps)
Edit the server config file /opt/frp/server/frps.toml:
[common]# Server listening port – clients connect herebindPort = 7000
# HTTP entry port (if using HTTP proxies)vhostHttpPort = 8080
# HTTPS entry port (if using HTTPS proxies)# vhostHttpsPort = 8443
# Authenticationauth.method = "token"auth.token = "your_strong_token_here" # Use a strong password
# Dashboard config (web admin interface)webServer.addr = "0.0.0.0"webServer.port = 7500webServer.user = "admin"webServer.password = "your_dashboard_password"
# Logginglog.to = "/var/log/frp/frps.log"log.level = "info"log.maxDays = 7
# Enable Prometheus metrics (optional)enablePrometheus = trueNote: Remember to open ports
7000,7500,8080, etc., in your cloud server’s security group.
Start the server:
# Run in foreground (for testing)./frps -c ./frps.toml
# Run in backgroundnohup ./frps -c ./frps.toml &Using systemd (recommended):
[Unit]Description = frp serverAfter = network.target
[Service]Type = simpleExecStart = /opt/frp/server/frps -c /opt/frp/server/frps.tomlRestart = alwaysRestartSec = 5
[Install]WantedBy = multi-user.targetsudo systemctl daemon-reloadsudo systemctl enable frpssudo systemctl start frpssudo systemctl status frpsVisit http://your_server_ip:7500, enter the Dashboard username and password, and you’ll see the admin interface.
4.4 Configure the Client (frpc)
Edit the client config file /opt/frp/client/frpc.toml:
[common]# Server address and portserverAddr = "your_server_ip"serverPort = 7000
# Authentication – must match the serverauth.method = "token"auth.token = "your_strong_token_here"
# Logginglog.to = "./frpc.log"log.level = "info"log.maxDays = 7
# ==== TCP Proxy Example ====# Map local port 22 to server port 6000[[proxies]]name = "ssh"type = "tcp"localIP = "127.0.0.1"localPort = 22remotePort = 6000
# ==== HTTP Proxy Example ====# Map local web service at port 8080 to the server[[proxies]]name = "web"type = "http"localIP = "127.0.0.1"localPort = 8080customDomains = ["your-domain.com"]Start the client:
# Run in foreground./frpc -c ./frpc.toml
# Run in backgroundnohup ./frpc -c ./frpc.toml &4.5 Advanced: Access via Domain Name
If you have a domain, you can configure HTTP/HTTPS proxies to access internal services via the domain.
Additional server config:
# In frps.toml, make sure this is setvhostHttpPort = 8080Client config:
[[proxies]]name = "web"type = "http"localIP = "127.0.0.1"localPort = 8080customDomains = ["web.your-domain.com"]Then add a DNS record at your domain registrar:
web.your-domain.com → your_server_ipNow visiting http://web.your-domain.com:8080 will automatically forward to your internal service.
4.6 Advanced: Load Balancing
FRP supports load balancing across proxy groups, which is great for multi‑instance deployments:
[[proxy groups]]name = "web_group"type = "load-balance"selector = "round-robin"servers = [ { name = "web1", localIP = "192.168.1.100", localPort = 8080 }, { name = "web2", localIP = "192.168.1.101", localPort = 8080 },]5. Security Hardening Recommendations
FRP is powerful, but misconfiguration can introduce security risks. Here are some hardening tips:
5.1 Mandatory Security Measures
- Use a strong token – Don’t use simple passwords; generate a random, strong one
- Restrict Dashboard access – Use firewall rules to allow only specific IPs to access port 7500
- Enable TLS encryption – Add
transport.tls.tlsCertFileandtransport.tls.tlsKeyFilein the[common]section - Avoid running as root – Create a dedicated frp user
5.2 TLS Encryption Example
# Server frps.toml[common]transport.tls.tlsCertFile = "/path/to/cert.pem"transport.tls.tlsKeyFile = "/path/to/key.pem"transport.tls.force = true
# Client frpc.toml[common]transport.tls.tlsCertFile = "/path/to/cert.pem"transport.tls.tlsKeyFile = "/path/to/key.pem"transport.tls.force = true6. Common Issues
Q1: Connection fails with “login to server failed”
- Check that the server is running properly
- Verify that
serverAddr,serverPort, andauth.tokenmatch the server config - Check firewall and security group rules to ensure the ports are open
Q2: HTTP service is not accessible
- Confirm that
vhostHttpPortis set correctly on the server - Check that the
customDomainsin the client config resolves to the server IP - Confirm DNS records have propagated
Q3: How do I check connection status?
- Visit the Dashboard (default
http://server_ip:7500) - Check the log files
- Use
sudo systemctl status frpsto see the service status
7. Summary
FRP is a powerful and flexible internal network penetration tool. Through this article, you should now understand:
- The basic concepts and use cases of FRP
- How FRP works under the hood
- Complete configuration for both the server and client
- Common security hardening measures
Compared to commercial internal‑penetration tools, FRP offers greater control and flexibility – and it’s completely open‑source and free. We hope this guide helps you better understand and use FRP.
References:
- FRP Official GitHub: https://github.com/fatedier/frp
- FRP Official Documentation: https://gofrp.org/en/docs/